
After purchasing your first canoe or kayak, you’ll need to figure out storage options. For most people, the home garage is the best option, with the canoe or kayak strapped to the ceiling.
There are pulley and hoist systems you can purchase online. However, they can be cumbersome to use and rely on grip strength, low ceiling heights, and awkward release mechanisms.
Well, in this article, I outline how to lift and store your canoe or kayak on your garage ceiling using a simple winch and pulley system I’ve devised.
You can totally do-it-yourself, as well as modify the hoist system to fit your unique requirements. And the great thing is it works for a high garage ceiling like mine.
Article Contents:
How Does the Pulley Hoist System Work?

The overall concept of this hoist system is to use a series of pulleys attached to the canoe and ceiling, and a hand-operated winch to lift the canoe into your garage ceiling.
It’s up and out of the way so you still have plenty of room to park cars!
The pulleys do two things:
- They help to reduce the force applied to the winch via mechanical advantage.
- They are used to reroute ropes to get to the winch.
Once set up, the winch does all the heavy lifting, literally.
You can raise and lower the canoe in a controlled fashion which is ideal for people with limited mobility, seniors, or anyone looking for an easier way to store a canoe or kayak.
Warning About “Boxed” Hoist Systems
There are a few out-of-the-box hoist systems for canoes and kayaks on the market including ones from RADD Sportz and StoreYourBoard.
I somewhat agree that they seem simple and convenient for some people and certain situations.
However, after critically looking at their systems, I see a few key design flaws that may limit their usefulness:
- The systems are usually designed for lower ceilings (i.e., less than 10’).
- They rely on hand gripping and pulling on ropes.
- The built-in braking system can be cumbersome to use correctly.
- The pulley system does not reduce the working force enough to be advantageous.
So, that’s why I chose to come up with my own, custom canoe pulley hoist system for my garage with a very high, 16-foot ceiling.
Design Considerations for Hoist System

Now before you buy anything and start drilling holes into your garage ceiling, let’s take a step back to understand how this system is designed, how it will work, and what considerations need to be made.
Planning it out on paper is a lot easier than making ad-hoc decisions. (You’ll thank me later!)
Measure Canoe / Kayak
Every kayak and canoe is different. By measuring the dimensions and weight of your watercraft, you’ll know where it can fit in your garage, what load is going to be on hoist system, and where you need to position the hoist system.
- Using a tape measurer, measure all the dimensions of the canoe including the length from tip to tip, width at the widest part, and height at its tallest point.
- Using a scale, weigh the canoe. The best way might be pick up the canoe and stand on a scale while holding it, then subtracting your weight alone.
Once you know the weight of your canoe, you’ll know what load rating of equipment you should be purchasing.
Assess and Measure Garage Ceiling
Finding the right spot to store your canoe in your garage requires careful consideration.
You want to maintain enough clearance from other things in your garage such as the garage door, windows, central vacuum canisters, items on walls, etc. as you lift and lower the canoe.
The other important factor is finding out where the ceiling joists are located. This requires using a ladder and a stud finder to locate and mark where the joists are located where you’d like the canoe to be positioned.
- The anchor points for all the pulleys must be fastened into joists, and not drywall.
- Likewise, the hand winch must be fastened to a wall stud, and not drywall.
Create Sketches with Dimensions
Now, with all the information about your garage in hand, make a sketch in both plan view (top down) and profile view (sideway).
It doesn’t have to be perfectly to scale, but you want to indicate major dimensions and mark locations of joists and protruding items (windows, doors, central vacuum) you want to avoid.
Determine Ceiling Anchor and Canoe Strap Locations
Next, using the sketches, you want to align the canoe dimensions with the location of the ceiling joist anchor locations, as well as offset the canoe from any obstacles.
The canoe will be lifted into place using two lifting straps located on each end. The straps should be positioned 20% of the distance from each end. So, if you have a 16.5’ canoe, each strap would be approximately 3.5’ from each end.
Now that you know where the canoe straps are located, align the strap locations with the nearest ceiling joists, and mark it on your drawings.
Determine Winch Location
A hand winch is used to raise and lower the canoe or kayak into position. It will be connected to the pulleys and rope so there needs to be enough clearance.
- Position the winch to the side of the canoe ensuring that there are no obstructions for the rope that will be connected to the ceiling anchors.
- Ensure there is enough room for you to stand and rotate the winch arm without the canoe hitting you.
If the winch is positioned parallel to the canoe (like ours is), you will need to locate an additional anchor point(s) on the ceiling or wall to route the rope around the canoe to avoid them touching.
Pulley System Good-to-Knows

I’m sure we all learned about pulleys in elementary school. But, exactly how they help reduce the lifting load can be a bit confusing.
But, once you know how pulleys work, you can maximize their usefulness!
How Mechanical Advantage Works for a Pulley
Simply put, a pulley redirects a tensional force applied through a rope onto a load. And, each additional pass through a pulley works to reduce the applied force required.
Multiple passes through a pulley gives greater mechanical advantage and leverage applied to a load.
The image below showcases three easy to understand pulley configurations [Reference]:
- In configuration 1, the top pulley simply redirects the tensional force onto the rope in a 1 to 1 ratio. There is no mechanical advantage for lifting in this setup.
- In configuration 2, the rope affixed to the top pulley extends down and around the bottom pulley and back around the top pulley. The same force applied to the rope is effectively doubled in a 2 to 1 ratio since there are two sections of rope connected to the load bearing end.
- In configuration 3, the rope affixed to the bottom pulley extends upward through the first top pulley, down through the bottom pulley and back up through the second top pulley. Now, there are three ropes effectively pulling on the load bearing end creating a 3 to 1 ratio.
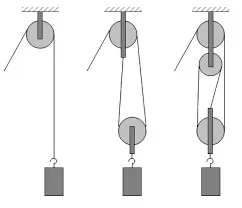
Configuration 3 (right most in image) is how we’re going to setup the pulleys in this hoist system.
Tools and Hardware Required

To build the storage hoist system, you’ll need the following tools and hardware. Everything should be available at your local hardware store. But, just in case they aren’t, I’ve included links to equivalent items online.
Hopefully, some of the material can be found around your house such as wood screws, rope, lashing straps, or washers.
Tools Required
I’ve listed below a few basic tools that you will need. If you don’t have the right tools, you can easily rent them from your local hardware store or borrow them from a helpful neighbour, friend or family member!
- Ladder (to reach the ceiling)
- Drill
- Impact driver
- Drill bits
- Driver bits
- Tape measurer
- Pencil
- Stud Finder
- Wrench (if required for winch bolt installation)
Hardware Required
To install the exact same pulley hoist system as me you’ll need to following hardware. However, make sure you create a detailed plan first and then make the necessary modifications to the hardware to match your unique situation.
- 5 x 1-inch swivel eye single pulley with snap carabiner
- 1 x 1-inch swivel eye double pulley
- 1 x 5/16 x 2 ¾ inch snap carabiner
- 4 x anchor point d-ring
- 1 x hand winch
- 1 x 2-pack 1-inch x 4-foot lashing strap
- 1 x 100’ paracord 550
- 16 x 3.5-inch deck screw
- 3 x #8 1-inch truss head wood screw
- 3 x 1-inch diameter washer
- 1 x 5/16 x 2-inch hex bolt with hex nut and washer
- 1 x 10’ dock rope
Hoist System Installation Instructions
Once you’ve generated your two drawings outlining the positions of all the anchor and pulley positions you can start the installation.
I’ve outlined the 11 steps for my installation. If your setup is slightly different, please adjust and modify the steps as required.

Step 1: Install Ceiling and Wall Anchors
Using a ladder, climb up to the ceiling. Measure, mark and confirm anchor point locations using a stud finder. In my setup, there are two main center anchor points (left and right), and one right offset anchor point.
It’s very important to ensure each anchor position is at a ceiling joist or wall stud and not just through drywall. Drywall is not strong enough for this application!
Using 3.5-inch deck screws, secure the d-ring anchors into the ceiling joists.

Step 2: Assemble and Install Hand Winch
Assemble the hand winch following the packaged instructions. Once assembled, test the winch location and suitability. Hold the winch in place and rotate crank arm to determine clearance.
If required, you may need to install a wood block to offset the winch from the wall so the winch arm can rotate freely.
Once the winch location is confirmed, secure the winch to the wall using multiple 1-inch truss screws with washers and hex bolt with nut and washer if applicable.
Install final d-ring anchor near winch to redirect hoist rope into winch wheel.

Step 3: Install Pulleys with Carabiners
Using a ladder, attach pulleys to anchor points with carabiners.
- If your pulley set up is identical to mine the double pulley is attached to the left ceiling anchor with a single carabiner.
- The right ceiling anchor has two single pulleys connected to the anchor with a single carabiner.
- And the right offset ceiling anchor has a single pulley with a carabiner to connect to the anchor.
On the floor underneath each of the two center ceiling anchor points lay a single pulley with carabiner. The floor pulleys and carabiners will connect to the canoe straps in step 8.

Step 4: Route Paracord Through Pulleys (Left Side)
Unravel paracord and hold one free end. Each free end of rope will be independently fed through the pulleys on the left and right side pulleys.
Starting with the left ceiling anchor, feed the free end through one of the two double pulleys on the ceiling, then down through the left floor pulley, up through the other side of the double pulley, then down to the left pulley.
The free end is then fed through the floor pulley housing and secured in place utilizing a bowline knot.

Step 5: Route Paracord Through Pulleys (Right Side)
Similar to the left side, the other paracord free end is fed through the pulleys on the right side.
Starting with the right wall offset anchor, feed the free end through the right offset pulley, then through one of the two right ceiling pulleys, down to through the right floor pulley, up through the second single ceiling pulley, and then down to the right pulley.
The free end is then fed through the floor pulley housing and secured in place utilizing a bowline knot.
Pro-tip: Ensure the paracord is wrapping around the pulleys neatly. You may need to rotate or re-thread the paracord through the pulleys so the lines are not overlapping.

Step 6: Balance Left and Right Side Pulleys
Feed the paracord through the anchor just above the winch and hold in place.
Attach weights to each side of the floor pulleys to make them taught. You can use a pair of boots on each side or hand a bag filled with stuff.
Pull on the two paracord sections that extend from the ceiling pulleys downward to balance the height of the floor pulleys above the floor. You want the carabiners to be the same height off the floor.
Adjust the slack on each line as you balance the two floor pulleys and mark the center point of the paracord with a permanent marker.
Tie a slip knot at the anchor to hold it in place.

Step 7: Secure Paracord Center Point to Winch
Feed the center point of the paracord through the winch and secure in place using the included cable clamp.
Start rotating the winching arm with the ratchet engaged and guide the first few rotations around the center wheel axle. As you rotate, the slack in the paracord will start to be taken up.
Eventually the slip knot on the anchor will be freed and the winch will be connected to the pulleys.

Step 8: Move Canoe into Position and Add Straps
Remove the weights from the pulley ends. Lift and move the canoe into position underneath the pulleys.
Place lashing straps around each end of the canoe, ensuring that the straps are located where the pulleys are hanging from.
Tighten the lashing straps so they do no slip inwards towards the middle of the canoe.

Step 9: Clip Pulleys to Canoe and Secure
Clip the pulley carabiner to each lashing strap. Using the dock rope, tie a loop around both carabineers and secure with a knot.
This rope ensures the canoe straps won’t slip apart from each other when lifting.

Step 10: Partially Winch Canoe and Balance Canoe
Start winching the canoe upward. Because of the pulley configuration and the gear reduction in the winch itself, you will need to rotate the winching arm quite a few times to start lifting the canoe.
Once the canoe is hanging a few inches off the ground, observe the canoe from the side and along its center.
If the canoe is on an angle, loosen the lashing strap on the higher side slightly until the canoe is horizontal.
Looking down the canoe length, check to see of the canoe is laying flat. If not, rotate the lashing strap and carabiner so that the canoe is hanging from its center point on both sides.

Step 11: Lift Canoe into Place
Once the canoe is balanced and centered, start rotating the winch arm to lift the canoe. Keep monitoring the canoe as it rises so that it is not hitting anything on the way up.
To lower the canoe, simply release the ratchet from the winch while holding the winching arm. Once unlocked, start rotating the winching arm in the opposite direction to unravel the paracord from the winch wheel.
This article contains affiliate links, which help support this blog at no cost to you!
hello shane trane
Can we get some better pictures of how you wrapped the paracord on the winch and pulleys.
Like how did you wrap 2 lines of paracord into a winch
Hi Scott!
Absolutely, I can try to upload more photos about that. I will be creating a video shortly showing all the steps as well which should provide a better explanation as well.
Shane