
A camping utility belt is the pinnacle of functionality while in the outdoors. It enables campers to be more productive and provides accessibility to essential tools.
Furthermore, a versatile camping utility belt allows quick access to potentially life saving gear such as bear spray, a knife, or even a handgun.
So, instead of purchasing an “off-the-shelf” utility belt, I decided to make my own!
Here’s exactly how I built and customized it for my personal needs, and how you can make your very own utility belt too.
Why a Camping Utility Belt is Needed
A utility belt for camping might seem a bit excessive. However, it can actually increase your productivity, saving you precious time and energy while in the woods.
Additionally, it can grant you quick access to self-defence tools if the situation calls for it.
Hands-Free Carrying
The biggest advantage a camping utility belt has to offer is hands-free carrying of tools.
For example, many backcountry campers must use an axe or saw to chop and cut wood for a fire. Once the firewood is cut, carrying it back to your campsite can be difficult and time consuming, especially if you’re also carrying the axe or saw.
Now, imagine holstering your axe to your waist and being able to carry more wood. Over time, the amount of extra wood you can collect and carry can really add up.
- That directly translates into reduced time and energy you can use towards other camp related activities.
From an axe, to a multi-tool, to a lighter, having these camping tools on you at all times can save you the hassle from making multiple trips to gear bags, or misplacing them around your campsite.
Protection from Animals
Another reason to consider having a utility belt while camping is keeping self-defence tools on you at all times.
This can be especially important if you are camping in cougar (mountain lion), moose, or bear country. These animals are highly unpredictable, so a surprise close encounter can turn dangerous in an instant.
- Bear spray, a knife or gun is no good to you if it’s laying in your tent or tucked away in a backpack.
- You need ultra-fast access to these tools if you are to use them effectively to ward off an attack and protect yourself.
So, by having your trusty fixed-blade knife, canister of bear spray or sidearm securely holstered to your waist, you should be able to deploy defensive measures quickly and easily.

Camping Utility Belt Components
Belt & Buckle
When deciding to build a utility belt, you’ll need a robust and comfortable belt to start off with.
- A good belt needs to have a heavy duty and adjustable belt buckle to keep it snug against your waist.
- It also has to have a sturdy, stiff and wide belt strap so as to not put too much pressure due to the added weight.
Many people choose to use leather as their belt material since it’s readily available and fairly inexpensive. But leather tends to sag, stretch and degrade when exposed to the elements over time, so it’s not a preference of mine.
Since I already have a stiff and wide nylon belt, I’ll be repurposing it as my utility belt. It should provide the perfect backbone to my DIY utility belt!
Pro-tip: After doing extensive research, another great option is the 1.5” wide, 2-ply nylon tactical belt from Klick Belt (Amazon link). The 2-ply webbing is rigid in the vertical direction, yet pliable in the horizontal direction. It also comes with a cobra buckle, which is fantastic and easy to use.
Sheaths, Holsters & Pouches
To carry all the equipment and tools on your belt you’ll need proper holsters and pouches. You can definitely build your own holsters and pouches from scratch but it’s a lot easier to purchase them or find suitable alternatives.
Since my knife already comes with a leather sheath, I’ll be using that. And, in some instances like my Leatherman multi-tool, tools comes with a built-in belt clip – no need for a holster.
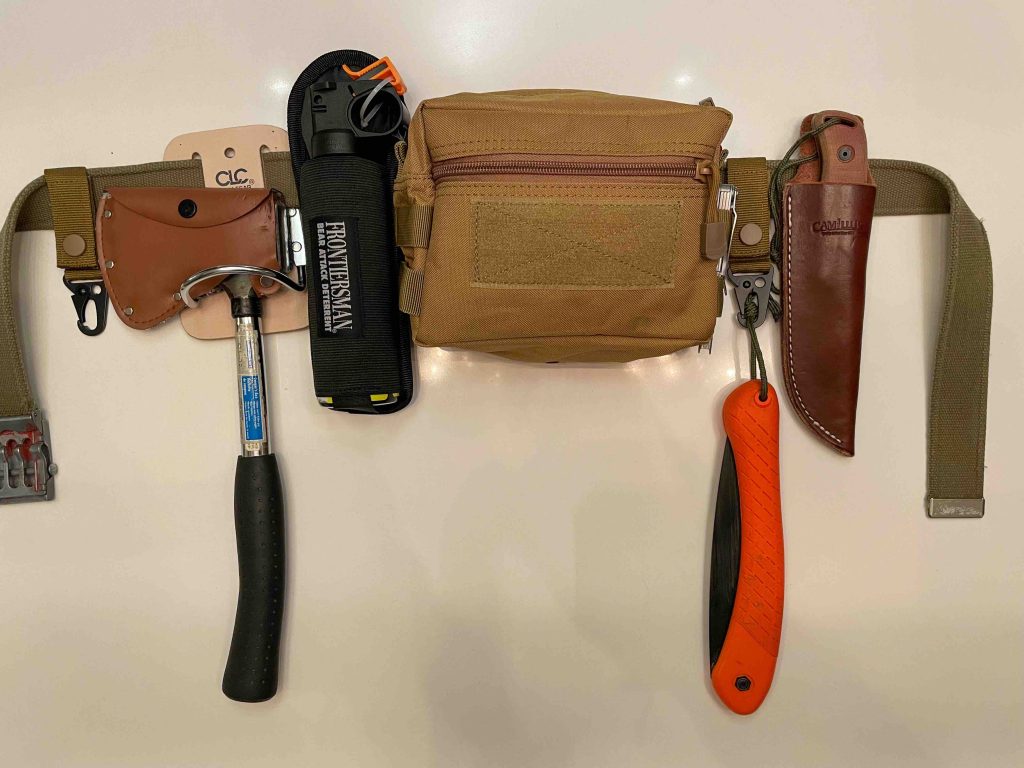
But, for the rest of my gear, I’ll be needing additional sheaths, holsters and pouches. Here is what I’ve found:
- Bear spray holster [Frontiersman bear spray canister nylon holster]
- Axe holster [Steel loop hammer holder]
- Large pouch [Multi-purpose tactical pouch]
- Velcro belt hangers [Molle gear clip]
- GPS or radio holster (future purchase) [Tactical interphone pouch]
Feel free to add or remove items as you seem fit – it’s your design!
Pro-tip: Personally, I do not carry firearms, but you can definitely add it to your belt. Just be sure to use the correct holster (concealed or open carry variant).
Equipment
My camping utility belt will carry only essential equipment for day-to-day activities.
Here’s a list of all the equipment and tools I plan on carrying as well as links to them if you’re thinking about getting something for yourself:
- Fixed blade knife and sheath
- Multi-tool
- Bear spray canister
- Hatchet
- Folding saw
- Radio (future purchase)
- Lighter
- Quick-dry towel
- Cellphone
- Snacks
Pro-tip: A lot of campers also like to include fire-starter materials, a small medical kit, and additional survival gear on their belt. My advice – keep it practical!
Constructing Your Camping Utility Belt
Once you’ve purchased or built each individual component of your belt it’s time to put it all together.
- Because my design is modular, I can tailor which holsters, pouches and sheaths I’d like to include.
For all my camping trips, I’ll add pretty much all the pouches and holsters to my belt. But for local hiking and biking trips, or even projects around the home, I can reduce the number of attachments to keep it light.
You can loop the main belt through your pant belt loops and attach each accessory around your waist.
Alternatively, you can slide on all the components onto the belt first and just wrap the belt around your waist on top of your clothes.
And there you have it… A fully customized, camping utility belt that can impress Batman!
This article contains affiliate links, which help support this blog at no cost to you!
Thank you so much.
This is great for a total newbie.
Tracey
I’m glad you found the information useful, Tracey.
Happy camping!