
Graduating to a long distance hike is a significant milestone for any outdoor enthusiast.
That’s because a long distance hike takes significantly more planning, preparing, and energy to accomplish.
So, before you lace up your boots and hit the trail, here are 8 essential tips for your first long distance hike.

1. Estimate Your Hike Time
When it comes to 99% of your experiences outdoors, timing is everything! And, proper time management is critical for a long distance hike.
Having to hike in the dark, through a severe storm, or even in the presence of dangerous wildlife can be a result of poor time management.
Establish a Turn-around Time
One of the best skills to master while long distance hiking is establishing a turn-around time.
Now, a turn-around time is typically established before you start hiking, but can get redefined while on the trail because it is influenced by the following:
- Total hiking distance and elevation change
- Weather forecast
- Sunrise / sunset times
- Current hiking speed
- Fitness and fatigue level of all hikers
As an example, to successfully summit a mountain, you need to reach the top AND get back down safely typically within daylight hours.
If your hiking pace is hindered by poor weather conditions, or fatigued hikers, and you’re running the risk of not getting back to the trail head or base camp on time, it’s imperative that you make the decision to turn back.
There are countless incidents where hikers have chosen to continue on, only to have gotten stuck on the trail or on a mountain because they failed to either establish a turn-around time, or didn’t stick to it.

Hiking in Low Light Conditions
While hiking, especially long distances, it’s important to utilize as much natural sunlight as possible. This ensures you can see the path and any obstacles clearly.
Be sure to check sunrise and sunset times using an online tracker, and take into account weather and terrain which might further impact the amount of daylight hours.
Pro-tip: If you plan on hiking in low-light conditions, don’t forget to take a reliable, high-quality headlamp with you. If you don’t have one yet, check out my top 3 recommendations for sport headlamps that come in handy for situations just like these!

2. Factor in Elevation Changes
Speaking of timing, changes in elevation can have a dramatic impact on your overall hiking speed and energy level.
Reduction in Pace
Traversing up and down steep inclines can drain your energy significantly faster. Your hiking pace will most likely slow down to compensate for the added effort of climbing or descending.
So, one of the best hiking tips to tackle this issue is to have additional rest stops. But, it’s important to account for them when you calculate your estimated hike time.
Carrying Excessive Gear
If the long distance hike trail has significant elevation gain, you should pay close attention to the load you’re planning to carry.
First time hikers who haul excessive amounts of gear and struggle on the trail might become discouraged from hiking again!
Firstly, make sure you utilize a good backpack. One that’s designed to distribute the load over your back, shoulders and hips. Secondly, only bring items that you need. Admittedly, this does take some trail and error… (the jokes write themselves).
Hiking Time Estimate Rule / Tool
An easy and commonly used method to estimate your total hiking time is using Naismith’s Rule [check out this online calculator].
Simply put, the Naismith Rule considers one hour for every 3 miles hiked and an extra 30 minutes for every 1000 feet of elevation change. Just make sure you add time for rest stops along the way!

3. Hydration and Caloric Intake are Critical
Keeping yourself hydrated and energized with nutrient-dense snacks is critically important for a good hiking experience.
Replenish Your Electrolytes
While on the trail, it good practice to constantly sip water along the way even if you don’t feel thirsty.
That’s because as you sweat, you tend to lose water and electrolytes. And, an imbalance or deficiency of electrolytes can be debilitating for your body.
- Electrolytes help regulate a whole host of bodily functions including your muscles and nervous system.
- Electrolytes helps prevent the onset of muscle cramps, and help retain water within the body.
So, for a long distance hike, consider adding electrolytes into your water. You can purchase electrolytes in the form of powders or tablets from most drugstores and supermarkets. I tend to use these electrolyte drink tablets on Amazon when I’m hiking or biking for long distances.
Use a Water Bladder
Another simple solution to drinking more water while outdoors is utilizing a water bladder instead of a water bottle. This way, you can quickly sip on some water while on-the-go instead of stopping and opening your backpack to remove your water bottle.
- A water bladder is convenient and less cumbersome to use, especially if you’re hiking with poles.
Personally, I have a dedicated hydration pack that includes a built-in water bladder that I use for long distance hiking and biking trips. However, if you already have a backpack, you can purchase a 1.5 L water bladder and tuck it inside.
Eating Enough Calories on the Trail
Some novice hikers tend to skip out on bringing enough food along with them to reduce the weight they carry. This seems like the right choice, but for a long distance hike this can actually be a bad idea.
You burn calories with every step, and significantly more while hiking over rough terrain, so you need to adequately fuel your body. Carrying and consuming snacks while hiking will sustain your energy level and give you the required calories to keep you going.
Although not entirely critical, I tend to estimate the calories I need before each long distance hike.
- There are free online calculators help you estimate your calories burned based on distance, elevation gain, speed, bodyweight, backpack weight, etc.
Knowing how much calories you’re most likely to burn, you can focus on what kinds of food and snacks will provide you that amount of energy.
- Dried fruits, trail mix, energy bars, granola, and jerky are some great options.

4. Wear Proper Clothes
A soggy, sweat saturated cotton t-shirt clinging onto your back during an already strenuous hike can feel pretty uncomfortable.
Truthfully, most of us find out the hard way which clothing choices are good and bad for hiking.
Eventually though, we all learn that it’s all about being strategic and selective with our clothing especially during more challenging outdoor activities.
Choose Weather Appropriate Attire
Before heading out, make sure to consider the seasonal and anticipated weather conditions to select what to wear and what to take along with you.
Everything from your underwear to your rain jacket needs to be well thought out, especially if you don’t want a teeth-chattering or sweat-pouring experience.
Generally, it’s best to wear clothes made out of moisture-wicking, quick-drying fabrics. During summer, opt for lightweight, breathable clothing. In winter, wearing multiple layers helps to trap in heat.

Layer-up!
Throughout your hike there could be large temperature variations throughout the day and with altitude gain.
As you climb up a mountain, you’ll definitely notice a gradual drop in temperature which might warrant an insulated jacket.
So, by mastering a proper layering technique, you adapt to temperature changes during your long-distance hike.
Pro-tip: Check out my detailed clothing guide for all your year-round adventures.

5. Wear Proper Footwear
To hike at your fullest potential, your feet require the best support and protection you can afford.
Proper comfortable footwear can definitely enable you to unlock and achieve your long distance hiking goals. But, there are a few key things to keep in mind.
How to Prevent Foot Injuries?
Before diving into what type of footwear you should consider for any long distance hike, let’s first discuss why proper footwear is important.
Well, when you hike in rough, rocky, and wild terrain, the chances of sustaining injuries are higher. Your feet, especially your ankles, heels and sides of your feet, are prone to bruises, sprains, and blisters without adequate protection.
And wearing ill-fitting hiking shoes or using low-quality socks can make things worse.
- The increased friction between the shoe and skin can cause calluses and blisters.
- Loose fitting boots can more easily allow your foot to roll and sprain while hiking over uneven terrain.
- Poor circulation and insulation during winter hikes can lead to frost-nip and even frostbite at extreme conditions which can damage the skin irreversibly.
So, the shoes you choose should provide the required comfort, breathability, coverage, durability, insulation, and traction to withstand any long distance hiking conditions.
Hiking Boots vs. Trail Shoes
There’s an ongoing debate in the hiking community between wearing hiking boots and trail running shoes. So, which one is better, really?
Well, I think it comes down to functionality and comfort. Below is a comparison of the advantages and disadvantages of hiking boots versus trail running shoes.
Hiking boots:
- Are designed to withstand very rough trail conditions since they are made from thicker and in some cases more durable materials which does make them heavier and less forgiving.
- Usually come in low to high ankle heights to provide more support and protection for your feet.
- Provide excellent grip and water resistance.
- Are highly durable and long-lasting.
- Typically used for cold weather conditions.
Trail running shoes:
- Are a lightweight and more breathable.
- Are great for easy to moderate trail terrain which allows you to hike significantly faster.
- Generally ideal for dry weather conditions, but plenty of high-quality trail runners made out of quick-drying fabric work fine in wet conditions as well.
- Not suitable for low temperature conditions.
Wearing Proper Hiking Socks
Another key hiking tip often overlooked is to wear good quality, moisture-wicking socks. Not only can these socks keep your feet cool and dry, they help prevent blisters and calluses from forming!
For winter hikes, I recommend wearing a pair of Merino wools socks to keep your feet insulated from the cold.

Using Hiking Gaitors
If your long distance hike covers wet or muddy terrain, or if you run the risk of walking through leech or tick infested areas, I highly recommend investing in a pair of all-terrain hiking gaiters.
Gaitors a great way to keep your lower legs protected from parasitic critters, as well as cuts and scratches from prickly bushes.

6. Share Your Itinerary Before Leaving
Any extended outdoor activity has its fair share of risks. And whether it’s a popular hiking spot or a backcountry trail, it’s important to never underestimate your safety.
So, whether it’s getting lost in the forest, stuck during a storm, or attacked by a wild animal, it’s always a good idea to share your itinerary and location with someone you know.
In some cases, a long distance hike or overnight trip will sharing this information with a friend, family member or even a colleague can potential help safe your life if the worst case scenario comes true.
- Share your route location, duration of the hike, emergency contact information, and a detailed itinerary with someone you trust.
- Provide them the contact details of the ranger station, local police, and all the hikers going with you.
- Plan check-in times beforehand and stick to them as much as possible.
Sharing this information will cut down on confusion and can expedite search and rescue operations during an emergency.

7. Consider a Backup Map & Compass or GPS Device
Most hikers tend to rely on their mobile phone for navigation while hiking. However, in the backcountry, reception can be limited, and some apps rely on cellular data to work correctly.
Besides signal drops, you could also encounter battery issues, location inaccuracy, and even other functionality issues. Worst-case scenario is that your phone gets damaged or broken, leaving you up Schitt’s Creek (great show, by the way).
Carrying a small compass and hard copies of maps is always a great idea since it lets you hone your orienteering skills.
GPS Device Recommendation
For more challenging or long distance hikes in unfamiliar territory, a dedicated GPS device is your best bet. Personally, I would recommend a Garmin inReach Satellite Communicator.
It functions as a handheld communicator, GPS guide, and emergency transponder. A device like this can be a literal lifeline between you and emergency services.
Activating the emergency transponder will automatically notify rescue personnel of your exact location.
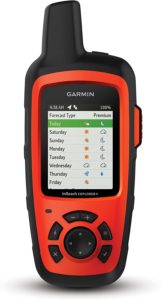
- 100% world-wide coverage
- 2 way text messaging
- GPS tracking and sharing
- Weather updates
- Digital compass and altimeter
- SOS function with interactive communication with 24/7 search and rescue centre

8. Consider Using Trekking Poles
At first glance, hiking poles can seem clunky and cumbersome to use. But hiking long distances, over uneven terrain, or steep inclines and declines is where hiking poles can make a massive difference.
- Hiking poles work by redistributing your weight, helping to reduce fatigue and ease the stress on your back, hips and legs.
- Hiking poles to improve your pace since they utilize you’re your arms to help propel you forward.
- You can use hiking poles to check the depth of the water in rivers and streams before crossing, as well as clear bushes along the you path.
It’s such a versatile tool. I have a pair of Black Diamond folding trekking poles. They pop together in an instant, and the top section can be lengthened to fit hikers of different heights.
The poles have a textured grip, and, since they’re made from aluminum, only weigh 510 grams!
Pro-tip: For more in-depth information, check out how to size and use trekking poles correctly.
This article contains affiliate links, which help support this blog at no cost to you!