
For the sheer amount of people exploring more of the outdoors, getting lost while hiking is pretty rare. But, from time to time, individuals venture into the wilderness and end up being unable to find their way out.
Whether its stepping off the path, following the wrong trail, or losing your sense of direction, realizing you’re lost is a dreadful feeling. And, as time ticks away, the danger seems more persistent, and panic might start to set in.
But, the probability of getting lost while hiking heavily depends on your preparedness before you set foot on the trail. So, here are 7 strategies to keep you from getting lost while hiking.

1. Study the Map and Trail Before Starting
Some hikers assume they can figure out the trail as they go and only take a quick look at the map before the hike. Avoid this grave mistake!
Instead, most proficient hikers familiarize themselves with the route beforehand. They try to memorize and visualize the route, including the total kilometers, elevation changes, forks in the trail, and landmarks.
Doing this can reduce the risk of getting lost, since you’re familiarizing yourself with the route mentally before doing it physically.
Learn to Read a Topographic Map
Studying different maps and identifying landmarks can help you navigate trails while hiking more easily. I recommend learning how to read both regular maps as well as topographic maps to see how trails can vary with terrain.
For example, contour lines on topographic maps indicate a fixed elevation change. Highly concentrated lines indicate steep slopes, and circular contours indicate mountain peaks.
- Topographic maps also show other geographic features such as rivers, public and private land boundaries, and service roads.
So, bring a printed map along with a compass as backup and utilize your orienteering skills to help prevent yourself from getting lost if, especially if and when your phone craps out!
Pro-tip: For more info on topographic maps, including how to download and print maps at home, check out the United States Geological Service and National Resources Canada.

Learn About the Trail
Knowing the status and conditions of trails is super important. Trail details can inform you of cliffs, ravines, steep slopes, and other dangerous areas.
I highly recommend using a trail app like Trailforks, Komoot, or AllTrails to get insider information on the trails. Hikers will post comments on trail conditions, as well as recent animal sightings and insects conditions, as well as dangerous areas to avoid.
Alternatively, if you don’t want to use any apps, trail details are usually posted at the trail head. Large boards with maps detail the route, major features, as well as information to contact authorities.
Pro-tip: Before starting a hike on a new trail, I usually snap a photo of the information board at the trail head. That way I can quickly reference it if my cell reception drops.

2. Hike Attentively, Don’t Just Follow the Leader
When you’re hiking in a group, the leader is usually responsible for guiding the rest of the members down the trail. But even the most experienced leaders can make mistakes, get lost, or get injured by taking a wrong turn by going off-trail.
And, if you’re just blindly following the leader you’ll have a tough time getting back or finding help. But, you can prevent that from happening.
Switch Positions, Share Responsibility
To prevent yourself (and everyone else) from getting lost when your hiking leader becomes immobilized, it’s best practice that everyone chips in and leads the group.
By switching positions, multiple hikers take on the role of navigator. That means a higher likelihood of staying on track and not getting lost.
And, when more people are responsible for knowing the path, they are intrinsically more accountable for remembering the route.
3. Learn How to Read Trail Signs and Markers
Trail markers and route signs are in place to help you hike safely from the trailhead to the end without getting lost.
They’re usually etched, attached or painted on trees or posts to be easily recognizable. By following them, you will stay on the right course.
What Do Trail Markers Mean?
It’s vital, especially for novice hikers, to have a thorough understanding of what trail signs and markers mean.
A crash course on trail markers can help you learn about their purpose, where they are found, and how to interpret them accurately.
How to Blaze a Trail?
Now, say you hike on an unmarked trail and want to leave traces/marks for your own safety and help fellow hikers. It’s called blazing a trail.
The best way to do it is by marking tree trunks on both sides using an ax or tying high-visibility ribbons around them.
This way, you can find your way out by following your own markers.

4. Avoid Bushwhacking
Bushwhacking sure sounds like a tempting adventure for ardent hikers. But, hiking in vegetation-dense areas off-trail is an easy way to get lost in the wilderness.
Going Off-Trail is Risky
Hiking in thick bush can disorientate you rather quickly, especially if you don’t have a lot of experience. Every path could look the same, making it difficult to retrace your way back.
Couple that with unfavourable weather conditions and you have the perfect recipe for getting lost while hiking.
Higher Likelihood of Accidents
Bushwhacking is no easy task. You have to stay alert and focused all the time, and it can drain your energy really fast. One wrong step and you can twist an ankle or injure your knee.
And, as you hike through the thickets, you can sustain scratches and other sorts of injuries. A rouge branch scratching your eyes is a real hazard (it’s happened to me a few times!).
Plus, your clothes can get ripped by thorns or sharp branches. It can be a very harrowing experience trying to get back out with your wits (and clothes) still intact.
5. Take Note of Landmarks
Taking note of landmarks can tell you how far you have travelled, how close you are to the campsite, or whether or not you’ve made a hiking blunder!
Mark Landmarks on the Map
If you come across landmarks shown on a map, mark them to denote you have passed them. You can pinpoint your exact location using landmarks and even use them when calling for help.
Also, if you don’t come across a landmark on the trail, it could be a sign that you are off-route.
Take Pictures Along the Way
You would also come across other highlights along the way. It can be a stream, small bridge, hill, rock formation, fallen tree, statue/relic, or any noteworthy landmark that’s not mentioned on the map.
Take pictures on your phone or camera to remember them better. If you have to retrace your way back, they can be helpful, and help jog your memory about the way out.

6. Avoid Hiking After Dusk and Before Dawn
For a lot of hikers, there’s nothing scarier than hiking in complete darkness when you aren’t prepared for it. You can very easily get lost or walk straight into a dangerous situation.
Time your Hike
Timing is everything, which is especially true when hiking. By that I mean knowing the approximate sunrise and sunset times, when weather conditions are forecasted to change, and trail timing details can all help you from unexpectedly having to hike in the dark.
Pro-tip: Check out my guide on common camping mistakes to learn how to estimate your hike time accurately, along with many other useful tips!
Prepare for Hiking in the Dark
Although I don’t recommend hiking in the dark if you are alone or inexperienced, I can’t deny it’s a unique experience. I’ve done it a few times, but mostly during emergency situations.
So, if you do plan to hike in the dark, be equipped. I recommend hiking with a high quality headlamp to illuminate the path. This lets you hike hands-free to further prevent the risk of injury in the dark.
7. Carry a GPS-enabled Device
For hiking in more remote areas don’t fully rely on cell reception for navigation. Instead, a dedicated GPS enabled device should be relied upon.
Higher Navigation Accuracy
When hiking in unfamiliar terrain, you need a reliable device for navigation and tracking purposes. While your smartphone will promise to offer you that, it is not the best choice.
Poor or lack of cell reception, and low power operation can hamper a cell phone’s performance.
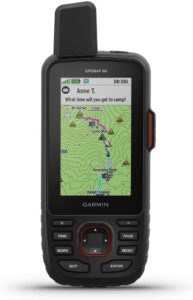
A GPS device such as a Garmin GPSMAP 66i is designed and built to perform in all sorts of conditions. They are more accurate, can give you weather information, and allow you to contact help if you get lost!
- Built-in topographic maps
- Cellular connectivity for live weather updates
- inReach enabled for S.O.S. communication with search and rescue function
Use a GPS-enabled Smartwatch
Another way to help prevent yourself from getting lost is by using or enabling the GPS tracking feature on your smartwatch.
For example, the Garmin Instinct smartwatch includes a built-in compass, altimeter, and GPS. The trail maps feature can also help you retrace your steps if you end up getting lost!
Personally, I use the Garmin Forerunner 245 for hiking and biking. I can quickly check to see if i’m on the right trail or took a wrong turn and need to find my way back.
This article contains affiliate links, which help support this blog at no cost to you!