If you’re heading into the backcountry, chances are you might be required to hang your food while camping.
For a first timer, figuring out how and where to hang your food can seem like a daunting task.
- How far away do you need to hang food from a tent?
- How far off the ground does it need to be?
- And, can you hang a cooler in a tree?
Well, I hope to shed some light on these questions so you too can hang your food safely and effectively while camping in the backcountry.
Why it’s Important to Hang Food When Camping
Hanging your food while camping in the backcountry is not only important to keep pesky rodents from rummaging through your provisions, it’s also mandatory in some parks.
That’s because, in some campgrounds and parks, bears actively seek out food storage containers no matter how “scent-proof” the device may seem.
All food containers emit invisible beacons of scents that attract all sorts of creatures, from raccoons and mice to coyotes and bears. And, if you’re not careful, you might put yourself at risk from a surprise wildlife encounter.
Sure, you can shoo away a ravenous raccoon, but when a hungry bear is hell bent on getting that jar of peanut butter tucked away in your cooler, good luck! For example, grizzly bears have a bit force of 1200 psi and can chew through even the “toughest” coolers.
Hanging your food when camping essentially makes it harder for animals, especially bears, from getting into your food. They physically won’t be able to reach it and, after enough time, will eventually leave to look for easier pickings.
This is the main reason why hanging food is so effective!
How Far Away Should You Keep Food from Your Tent
Now that you know why it’s important to hang food, the next step is to determine how far away you should hang food from your sleeping area.
Well, there are two important aspects to consider when selecting where your food should be kept:
- Wind direction
- Proximity
Let’s explore both below.
Keep Food Stored Down Wind
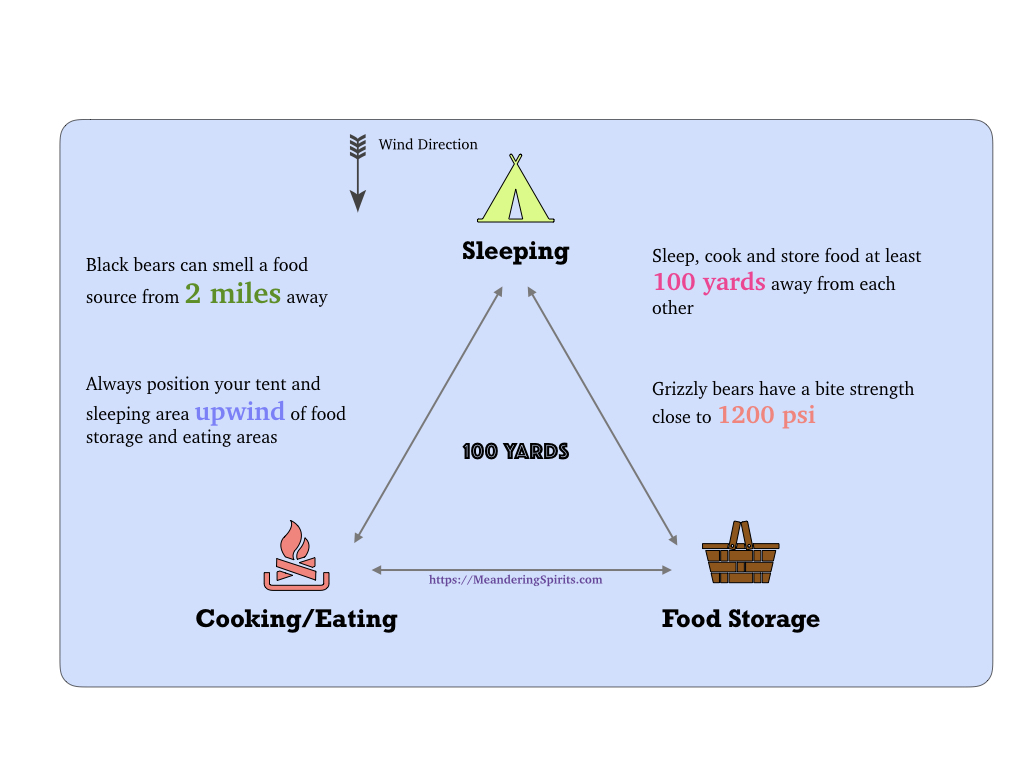
With the help of wind, scents can travel long distances before they become too diluted for detection by animals. However, a keen bear can detect food from close to 2 miles away and hone in to investigate.
So, when first arriving at your backcountry site, do a quick assessment of the predominant wind direction. Once determined, ensure that both your eating/cooking area as well as food storage areas are down wind of your sleeping area.
This is beneficial for two reasons:
- Firstly, it prevents scents from traveling into and contaminating your tent and sleeping area
- Secondly, if a bear does end up tracking down your food storage area, it won’t walk through your sleeping area while in pursuit
When you’re sleeping at night, you and your fellow campers are at your most vulnerable. The last thing you want is a chance encounter with a curious bear following the scent those strips of bacon you plan on frying up in the morning.
Follow the 100 Yards Rule
A general rule of thumb that most backcountry campers follow, especially when camping in bear country, is to sleep, cook and store food 100 yards away from each other.
100 yards, or the length of a football field seems like a long distance, but it can help ensure you and your food are kept safe.
By keeping such a large distance between these three areas, any scents generated in these areas won’t negatively impact your sleeping area.
100 yards gives plenty of space and a wide margin of error between you and any animal who tracks down any scent. Therefore, the odds of an animal encounter are drastically reduced!
Food Storage Options
When planning your backcountry adventure, it’s important to check to see what amenities are available regarding storing your food, and what food storage device you will need to bring.
For more in-depth information about food storage, check out my article Proper Food Storage While Camping.
Metal Lockers
These days, some campgrounds and backcountry sites are equipped with metal lockers for campers to store their food.
These lockers are designed with bears in mind and also keep out small animals. Their all metal design and locking mechanism makes it impossible for a bear to get inside.
Although metals lockers make storing food easy, some lockers are very compact and might not be large enough for a traditional cooler. If that’s the case, then you will need to hang your food storage container.
Traditional Coolers
To keep food (and drinks) cool and stored “securely”, some campers opt to bring a traditional cooler into the backcountry.
Coolers can be easily loaded into a canoe and paddled in or strapped onto the back of an ATV and driven into your campsite.
Coolers are spacious and somewhat lightweight, but do a mediocre job at keeping scents sealed in.
If left unattended over night, animals will definitely swarm all over it and may be able to get into the contents if the lid isn’t latched shut.
Some coolers are definitely better to bring into the backcountry than others.
-
A cost effective option I often recommend is a standard medium sized cooler from Coleman.
-
I’ve brought this with me on a few backcountry camping trips and hung it in a tree overnight with no issues.
-
-
A more durable (but not bear proof!) option I recommend is a medium sized cooler from Yeti. I love the build quality and insulating rating Yeti products achieve.
-
Campers swear by it and it’s super functional, especially in the backcountry. Plus, it latches down for extra security.
-
With the right setup and technique, any cooler can be hung from a tree to keep animals at bay.
Food Bags / Bear Bags
If you’re planning a hike-through or ultralight camping trip, a food bag or a bear bag is a great option.
Although not completely air-tight, food bags and bear bags operate similar to dry bags. You simply place any scented items in the bag, synch up the opening or clip it shut.
Food Bags
Food bags are great because they are collapsible, shrink to the size of your contents and are very light weight. They can be hung in a tree relatively easily.
However, since they are made from softer synthetic materials, they are susceptible to the sharp teeth of rodents.
But, hanging a food bag is incredibly easy and will definitely make it harder for animals to find and get into your food.
- I’ve used dry bags for food storage while backcountry camping.
- They’re light-weight and collapsable and perfect for a short trip with limited supplies.
Bear Bags
If you’re camping in an area with stunted trees and bears are present, a bear bag is recommended.
Bear bags are made from bite-resistant fabric and designed to be tied to or hung against a sturdy tree. And, after a long struggle, a tired bear will lose interest and leave the bear bag.
Bear bags aren’t scent proof by themselves, so it’s recommended that an odor-barrier bag is used as a liner.
- The Ursak Almitey bear bag is made from high-strength Spectra and Kevlar, the exact same materials used in bulletproof vests.
- The high-tech fabric can withstand a direct bear attack and will keep claws and teeth out!
- To help eliminate scents, I store food and scented items in reusable, odor-proof bags.
Food Barrels
Slightly more durable than a cooler, although not insulating, food barrels are often used for portage or expedition type trips.
They are made from hard and durable plastic, with a clasp-type lid for sealing in scents. For canoe trips, I take my 30L food barrel and fill it with non-perishable food, cookware and any trash items.
I still have to hang my food barrel because it isn’t build to withstand a bear attack but it can easily handle rodents.
Bear Canisters
Another alternative for food storage in bear country is a hard sided bear canister.
In certain regions of the world with sparse or stunted trees (e.g., high alpine, high latitude or arid regions), bear canisters might be your only option for storing food safely.
Bear canisters, like the BearVault Container or the Frontiersman Canister, are basically compact, portable food lockers that you carry with you. Canisters are made from extremely durable and high strength materials such as polycarbonate and polypropylene.
“Bear-proof” canisters weigh around 3 lbs pounds so you’ll need to factor this into your pack-weight.
They can fit neatly into a backpack but the downside is that they always take up the same amount of space no matter if they are filled or empty.
On the plus side, you don’t need to hang a bear canister. It can be placed on the ground, saving you time and effort in the backcountry.
How to Hang a Food Container
Safely and securely hanging a food container while camping takes the right gear and right technique.
Below, I outline the equipment you need and detail step-by-step instructions so that you can do it yourself!
The method I describe is great because:
- It allows for repeated access to your food
- Can be modified for heavier loads
- Helps protect and extends the life of your ropes
Equipment Required
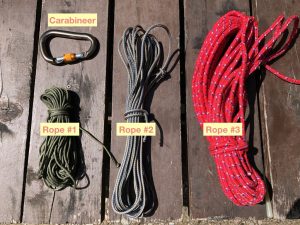
Rope #1 - "Throwing" Rope
Rope #2 - "Hanging" Rope
A hanging rope is a larger diameter, static rope used to hang the main carabineer. 30 meters [100 ft] of 4 mm nylon static cord is recommended since it’s strong, light-weight yet durable.
Rope #3 - "Pulley" Rope
The pulley rope is the main rope used to lift and lower your food container. Again, 30 meters [100 ft] of 4 mm static nylon cord is recommended.
Carabineers
Rock or Throw-bag
However, if you can’t find one, you can also use a small bag or sack, fill it with pebbles or sand and use it as well.
Step-by-Step Instructions
Step 1: Find the Right Tree
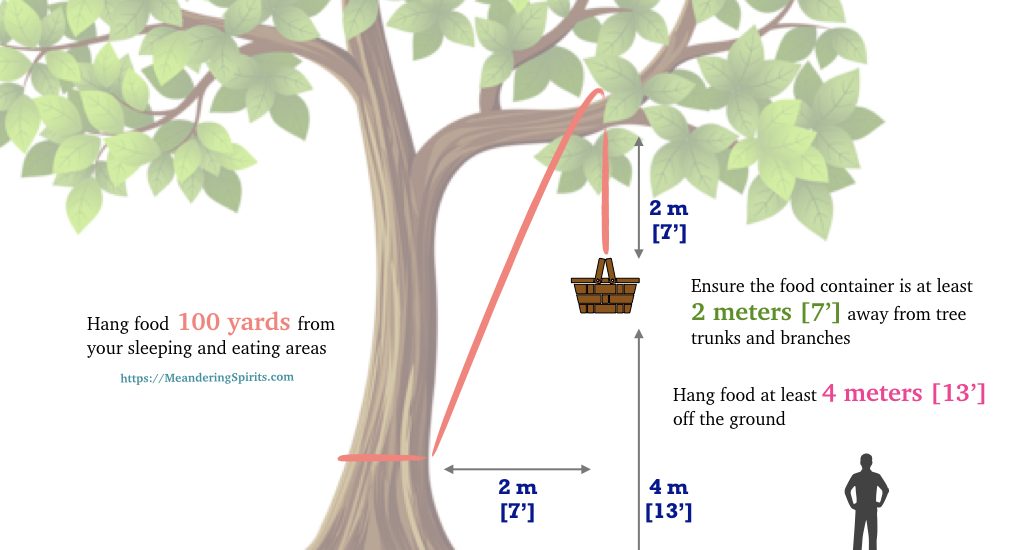
When first arriving at your campsite, pace out at least 100 yards from both your sleeping and eating areas.
Look for a sturdy tree with a branch or limb at least 6 meters [20 feet] high.
The branch needs to strong enough to hold the weight of your food container. The larger and heavier your food storage container, the larger and thicker the tree and limb needs to be.
Step 2: Toss the Throwing Rope
Securely tie one end of the throwing rope to a fist-sized rock (or a small bag filled with pebbles).
Aim and toss the rock over the tree limb. I find an underhand toss works best and is the most accurate.
If possible, ensure the rope lands at least 2 meters [7 feet] away from the tree trunk. However, if this is not possible don’t worry, you can always pull the food container away from the trunk.
Before throwing the rock, make sure everyone clears the area. The rock may strike the tree and ricochet in a random direction.
Step 3: Lift the Hanging Rope
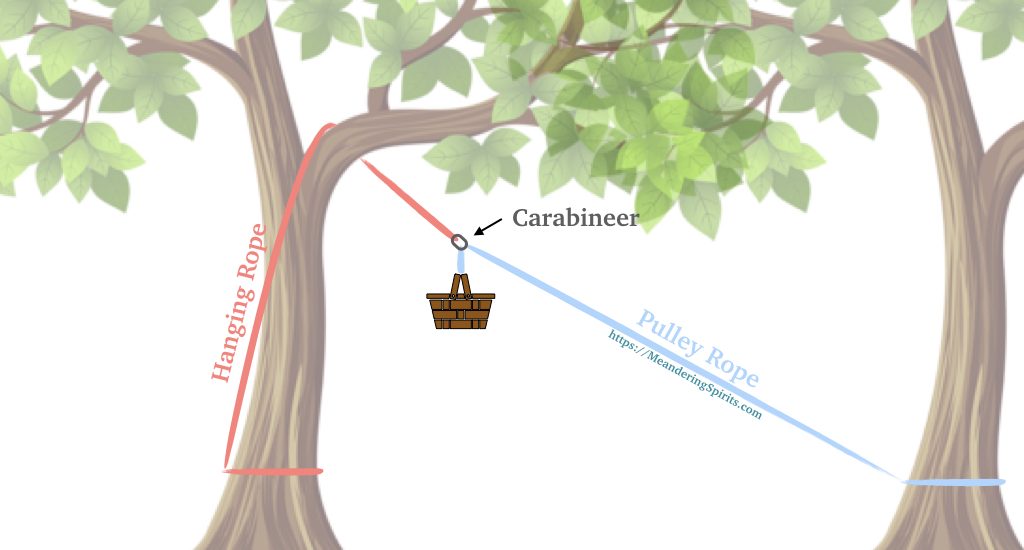
Next, remove the rock from the throwing rope and tie it to one end of the hanging rope.
At the other end of the hanging rope, securely attach a carabineer using a knot. I find a bowline knot works well.
Before lifting the hanging rope, thread the pulley rope through the carabineer. Ensure the pulley rope is pulled through 50%.
Now you can pull the guide rope and start lifting up the hanging rope. Keep pulling until the carabineer is at least 4.5 meters off the ground and at least 2 meters from the tree limb.
Remove the guide rope from the end of the hanging rope, and securely wrap and tie the end of the hanging rope to a nearby tree.
This rope does not need to be undone until you leave your site. The carabineer on the hanging rope acts like a pulley wheel, so that the pulley rope has something smooth to repeatedly go over instead of the bark of the tree branch.
Step 4: Attach Food Container to Pulley Rope and Lift
Now that the pulley rope is hanging from the carabineer, attach on end of the rope to your food storage container.
Pull on the other end of the pulley rope to life the food container up into the air, making sure it is at least 4 meters off the ground.
Securely wrap and tie the pulley rope around a nearby tree.
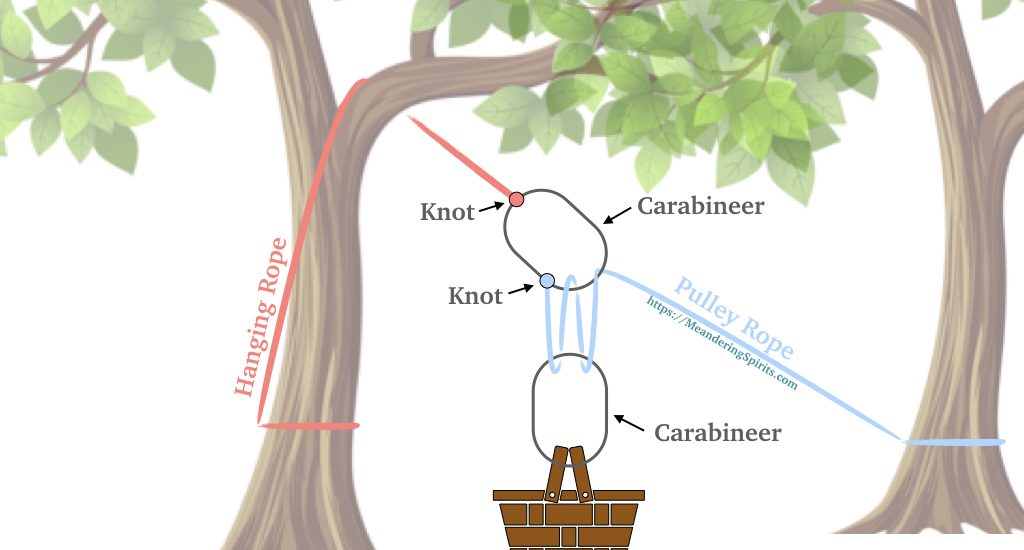
Heavy Load – Alternative Carabineer Setup
If you are lifting a significantly heavy food storage container, you will need to adjust your setup and lifting of the pulley rope.
This alternate technique relies on wrapping the pulley rope around two sets of carabineers to achieve mechanical advantage.
So, before lifting the hanging rope carabineer into place, attach the pulley rope to the hanging carabineer. Then attach a carabineer to the food container
Loop the pulley rope around and through the food container carabineer and then through the hanging carabineer twice.
Then lift the hanging carabineer in place and secure tie off the hanging rope. You can now lift your food container using the pulley rope using a make-shift pulley system.
This article contains affiliate links, which help support this blog at no cost to you!

